Color Printer Instructions – SAG
Covers:
Library Color Printer
The HP Color LaserJet M750 is located by the post directly in front of the tech desk. Printing to it uses 5 pages (50 cents) of print quota for every page. Double sided pages are 1 dollar (patrons are being charged per page of ink not per page of paper).
Our Color printer name on the computers is LIBRARY-CLJ-M750 and the print server is “gluon” it shows to users like this:
It is not the default on any PC. Default printers are set using whatever printer is the closest to the PC.
Printer Management
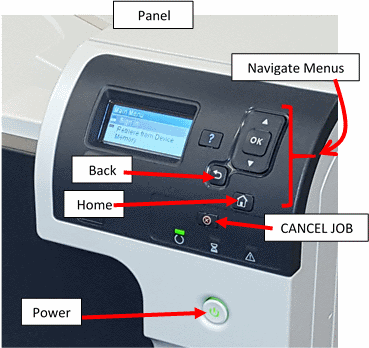
Power button
- On the right side under the panel.
- This printer will quickly sleep when not used and it wakes quickly when a print job is in the queue.
- To wake the printer press the Home button on the panel not the power button
- Hold the button for just half a second to turn the printer on or off
Printer Panel
- The Panel on this printer is not a touchscreen
- Navigate the panel options or read instructions with the
- Up, Down, OK, Back, & Home buttons.
- Read the panel area for instructions when there is a printer problem
- The Cancel Job button on the panel is the best way to cancel a job causing a problem.
- Don’t cancel jobs unless you know they are causing a printer problem
Printer Layout and Trays
All trays and the ink cartridge panel are on the front of the printer. The fuser door is on the top right.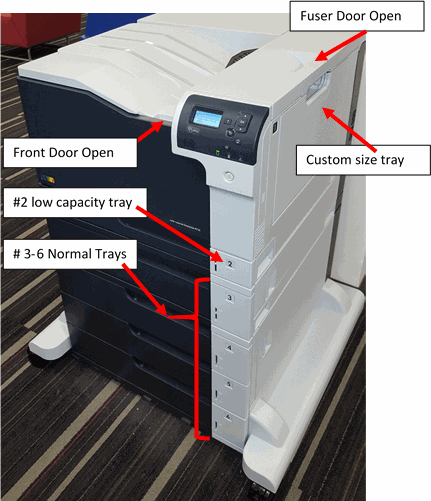
- The front door hides the cartridges but is of little value in removing paper jams. Paper does not go into that area while being printed. We only open that door to replace ink cartridges.
- The first tray –Tray #2– is a low capacity tray that is meant for odd and large size paper
- We do not use this tray at all
- Trays 3 – 6 are normal 500 sheet letter size trays
- We only fill tray 3 & 4. Two full trays of standard paper have been enough at any time.
- We dont have a high volume of color printing because of the cost.
- We only fill tray 3 & 4. Two full trays of standard paper have been enough at any time.
- When filling trays make sure the size guides are exactly 8.5 by 11 (letter size)
- Never fill a tray above the bend in the paper feed guide. Leave pages lower than the top of the tray to prevent misfeed paper jams.
NOTE: Tray 1 is the custom paper feed located on the right side of the printer. We NEVER use that on the public printers . If students need to use custom paper they MUST use the quick print station.
Toner Cartridges Low
We check the cartridges on the color printer every shift using the IP address. There are 4 cartridges, C, M, Y, and K or (Cyan, Magenta, Yellow, and Black). The printer is watched online to track how much ink it has at any given time.
- The ink needs to be changed when the cartridge is at 2% or Unknown AND the printer stops printing.
- OR if you see streaks on jobs and the cartridge is less than 10% you can change that cartridge.
- if it has more than 10% when it is streaking take the cartridge out and gently shake it then put it back.
REPORT EVERY TIME YOU HAVE TO CHANGE A BAD CARTRIDGE – ONE THAT IS CHANGED BEFORE 2% or UNKNOWN – ON THE LIBRARY TECH HELP FORM
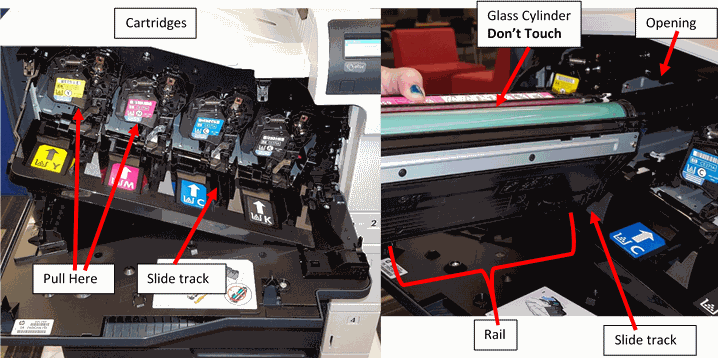
Changing a cartridge
- Open the front door and carefully bring it all the way down flat or the cartridge won’t slide in or out easily
- Each slot for a cartridge is labeled with a color matching and a letter code in case you have trouble with colors
- Y Yellow
- M Magenta (pink-purple)
- C Cyan (bright blue)
- K Black
- Each cartridge has a plastic lip/handle under the color label
- Put your fingers on the handle and pull it all the way out toward your body
- NOTE: You will have to lift the front end a couple times as you pull to get it all the way out
- Unpack and insert the new cartridge
- Use the instructions on the package to get it out of the package and ready to insert
- The top of the cartridge has a green glass cylinder NEVER touch the glass cylinder
- Fit the cartridge rail into the slide track, then slowly slide it all the way back – you will feel it settle into place
Inserting cartridges looks like this:
Paper jams
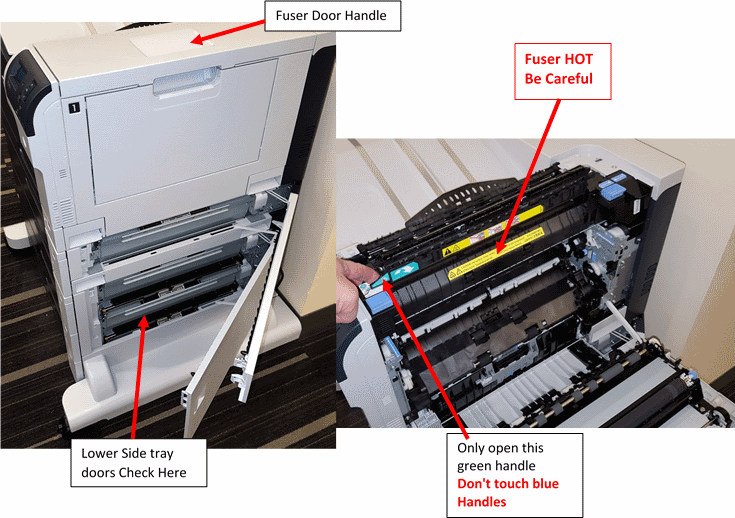
Start with the doors on the right side of the printer – open both the fuser door and the lower tray side doors.
**Warning – the Fuser is HOT – be careful when removing paper from here.
- The top right of the printer has an indented handle which you pull to open the fuser door
- In the fuser panel there is only one handle that lifts near the top – MARKED IN GREEN
- Don’t press or pull any blue handles or you could release the hot fuser itself
If after all the side doors are checked you dont see the paper jam you should then open the paper trays on the front of the printer to see if you need to remove paper from there.
Dont forget to report ANY printer issue that remains unresolved on the Library Tech Help Form
Web Form: library.newpaltz.edu/techhelp.php