Managing the HP LaserJet Enterprise M806x printers – SAG
Color Printer instructions here : https://library2023.newpaltz.edu/techpages/colorprinter.html
Power on and off
The power button is right on the front in the lower left side of the main body
- The button glows green when on
- When it’s in sleep mode this blinks every 15 seconds
- When in sleep mode one tap of the button will wake the printer
- Press and hold for half a second to power on/off.
- If the printer is in sleep mode you will need to tap the power button to wake it and then hit the button again to turn it off.
The Touch Screen Printer Panel
When the screen is dark press the home button location a few times to wake the panel.
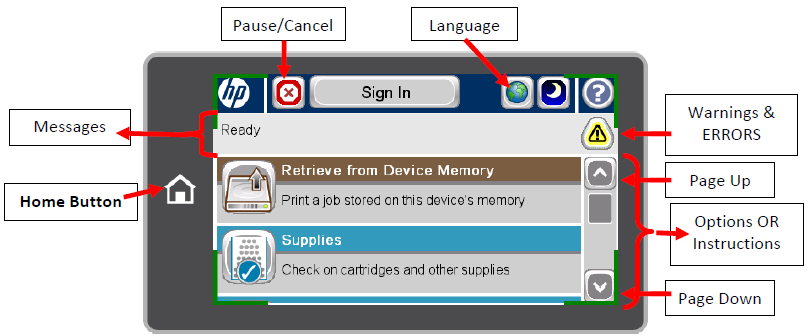
- Home Button
- Always takes you back to the main screen
- Messages
- Shows you the status of the printer & if there is more than one active status it will switch between them
- Example: ‘Tray 3 empty’ and ‘Ready’ might show alternately, meaning the printer is ready but tray 3 is empty as well
- An empty tray will NOT stop the printer from printing unless every single tray is empty (or has a different tray problem)
- Example: ‘Tray 3 empty’ and ‘Ready’ might show alternately, meaning the printer is ready but tray 3 is empty as well
- Shows you the status of the printer & if there is more than one active status it will switch between them
- Pause OR Cancel
- If a job is coming in or a job is stuck in the printer memory cancel it with this button. (This is the best way to cancel a job)
- If no job is being printed this pauses the printer & the screen will clearly say paused in the messages area.
- (DON’T PAUSE THE PRINTER). If a patron paused it you press cancel to un-pause and allow it to print again.
- Languages
- If you see the printer panel in French press this button and select English. (I would have disabled this button if I could!)
- Warnings & Errors
- This Icon shows as a yellow triangle if there is a normal issue like an empty tray BUT the icon shows as a red square when there is something you need to do to allow the printer to continue printing
- Press this button and instructions will show to help you resolve the problem (see Options OR Instructions below)
- Options OR Instructions
- Options from the home screen are mostly locked by a password and also mostly redundant to information that shows in Messages
- Instructions that show in this area are very useful; when there is an error it will tell you what to do with animated pictures and text to walk you through the solution.
- You need to use the Page Down button to read through these instructions.
Loading Paper
NOTE: Tray 1 is the custom paper feed located on the right side of the printer. We NEVER use that on the big public printers . If students need to use custom paper they MUST use the quick print station.
- We try not to add paper until most trays are empty but don’t leave a printer low on paper when you leave for the night. Closing shift needs to fill the printer trays with paper before leaving for the night. This keeps paper from getting old and reduces the likelihood of paper jams.
- Only use our printer paper in the public printers.
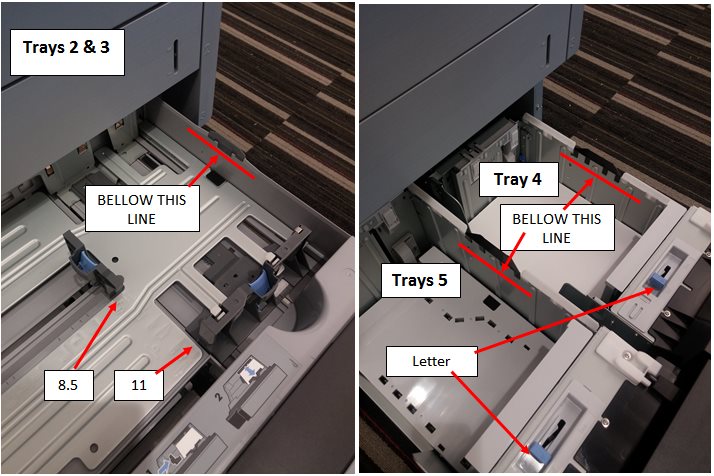
- Never fill paper above the dark plastic wedge on the right side of the tray (See Image Below)
- When refilling paper try not to move the paper guide size. If the guides are not in the exact correct position the printer will not print.
- The tray sizing sliders must always be set to Letter – or 8.5 by 11 – before closing the tray (the guides should be flush against the paper in the tray)
Not moving the guides when refilling the paper decreases the chances of this occurring but it is easy to bump them when filling a tray. Always check to make sure they are in the correct placement before closing the tray. Follow the steps below. (See Image and video below)
- Hold the paper tightly at one side so the stack stays even
- Fan your thumb through all the pages on the other side to put air between the pages
- Hold the stack from the middle letting the top and bottom edges to sag down into the tray
- Drop it into the tray
If the trays paper guides are not in the correct position the printer will think the tray is empty and will not print from it. It will also show up as empty on the webpage that we monitor.
Watch this awesome video Gary made for you to see it in action:
How to tell when to change the cartridge
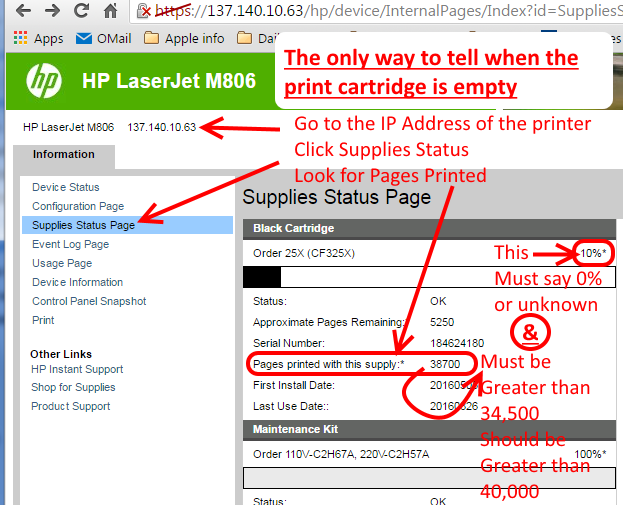
The printer warns you when the cartridge is getting low but it is not very helpful. Go to the printers Supplies Status web page and check 3 things to know if it is OK to change the cartridge.
Any 2 out of the 3 following indicators must be TRUE before you change the printer cartridge:
- There must be more than 34,500 pages printed with the cartridge
- The ink percentage in the status page must say 0% or Unknown
- The print job quality currently printing is showing streaking or other poor quality issues
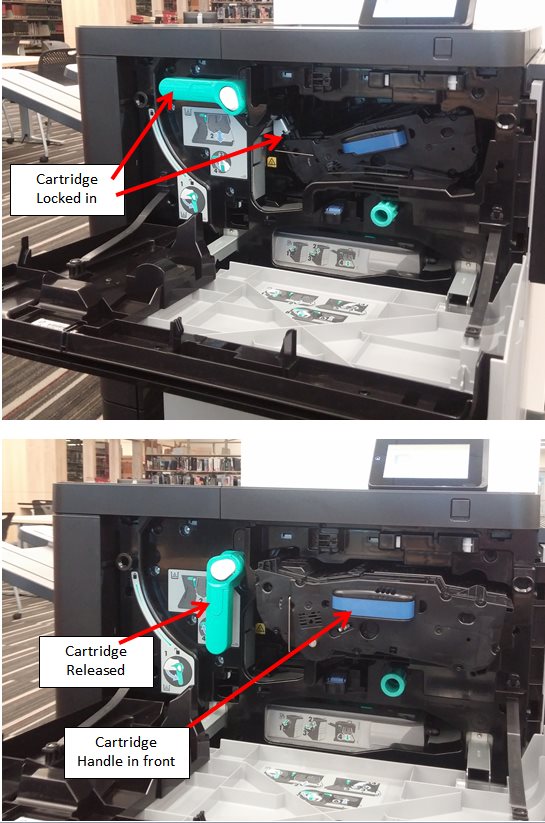
- Open the front of the printer and turn down the big green handle from horizontal all the way to vertical
- Slide the cartridge out using its blue handle
- To slide in the new Cartridge line up the hook on its top back edge with the guide in the printer
- Slide it all the way back until it stops
- Then push the button on the handle and rotate it up until it’s horizontal again (this is how the cartridge locks into place)
- If the handle will not turn back to a horizontal position it means the ink cartridge is not seated correctly
- Rotate the handle all the way down to vertical again to take the cartridge out and reinsert it
- If the handle will not turn back to a horizontal position it means the ink cartridge is not seated correctly
Clearing Paper Jams
TIPS: Before you start
- Press Warning/Error icon on the panel to get instructions (if they are not already showing on the display) – this will show you where the printer “feels” the jam so you know where to start looking
- There are green knobs/buttons on the printer to indicate what you can open and move to look for the jam. LOOK FOR THE GREEN – IT’S SAFE
- Always pull stuck paper slowly and carefully as possible so it doesn’t rip – If small pieces are left behind it will continue to jam
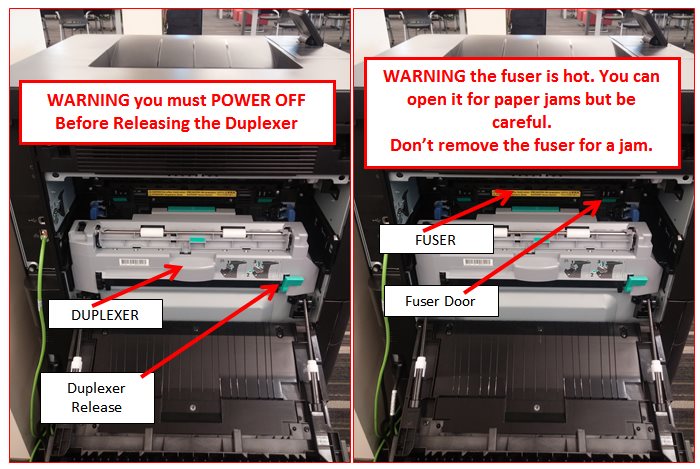
- You must power off the printer if you need to remove the duplexer tray – located on the left side of the printer
- Never remove the fuser but you can open the fuser flap to get paper if needed (its green)
Places to look to remove a jam (see pictures below to identify printer part locations):
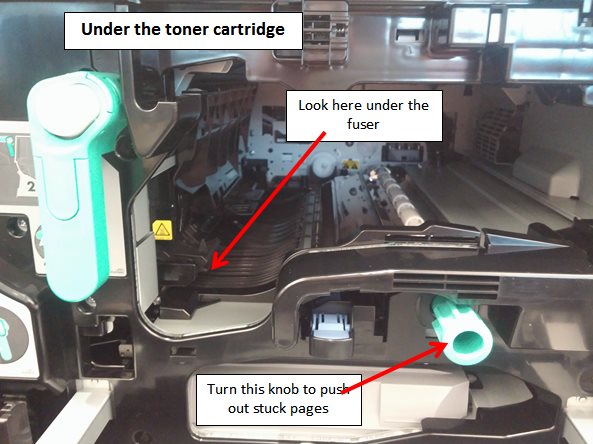
- Remove the toner cartridge to find any pages stuck underneath it – (pic 1)
- There is a green knob there, spin it to move hidden or stuck pages into view
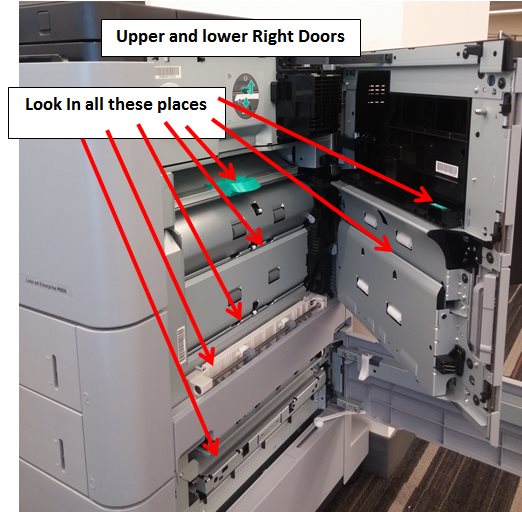
- Right side doors – check every spot inside – (pic 2)
- leave the right side door open until you are done looking
- Every paper tray – check inside each drawer
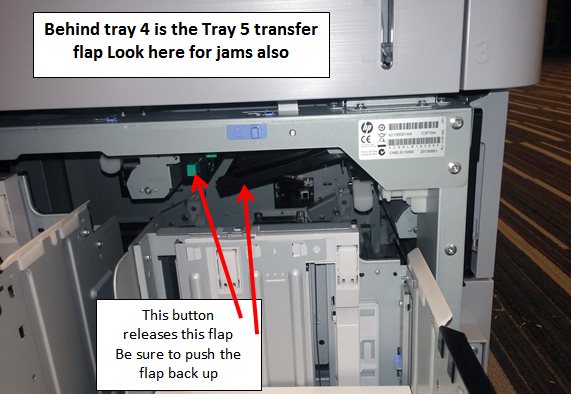
- Above tray 4 there is a green button that opens a flap – look for stuck pages – (pic 3)
- Make sure the flap gets closed before closing the tray or it will be stuck open
- Above tray 4 there is a green button that opens a flap – look for stuck pages – (pic 3)
- Left side door – look in the fuser flap and other visible spots
- Don’t remove the Duplex Tray unless there are repeated jams! Be careful in this door – the FUSER IS HOT
Repeated jams
- If printer jams repeatedly (like 3 or more times in a row) POWER THE PRINTER OFF and search every stuck paper location in this guide including removing the Duplex tray BUT Never Remove Fuser – it is hot
- Doing this with the power off lets the printer cool down and gives you time to search every spot on the printer
- If the problem does not go away put up an official “out of order” sign in a plastic case on top of the printer and turn the printer off
When you put an “Out of Order” sign on a printer and turn it off it does not remove the printer from the public PCs. There is nothing you can do to remove the printer from the PCs to stop students from printing to that printer. You will need to direct students to a PC closer to another printer and print to the new printer from there.
Report repeated jams on the Library tech help form. Let us know on the form whether the problem has been fixed by you or if you had to put up out of order signs.
*Feel free to get one of us from the tech office for help when trying to find the jam – if we are here
Dont forget to report ANY printer issue that remains unresolved on the Library Tech Help Form
Web Form: library.newpaltz.edu/techhelp.php